

The Monogram 1:48 scale B-17 with full interior and figures.

I was very happy when etch and masks finally arrived after a month. I was totally convinced that they were lost in the post.

Finally start building. I dry fitted the major components and discovered that Monogram has a clever solution to keep the wings in place without glue, just press it in and slide it forward to lockit, great!

I primed with diluted matt white.

I could not resist buying this decal set.

I used the Eduard etch for the dash board and throttle console, the rest is kit parts except the navigators lamp which I fiddled together myself.

I used oil paint to both wash and dry brushing.

The cockpit dry fitted against the fuselage.

The crew primed.

Now that they are ready, I discover that they may not fit so well in the aircraft. The pilots are too small and does not reach down to the pedals, waist gunners will be in a weird position when the aircraft is on the ground. Hope it does not show so much when everything is finished.

Body halves glued together and primed.

The wings fuselage are finally ready to paint. There was a lot of filling and sanding to get the joints smooth and nice. First, I used Tamiya white putty and sanded smooth then I filled in with Mr. surface 500 and sanded smooth again. Here are the wings and fuselage are pre shaded and ready to be painted.


The upper side was painted olive drab. The first step is to paint all the panels leaving the black panel lines.

The next step is to paint the entire surface with a more diluted paint mix. Make sure not to cover the black lines completely.


It is a tedious work to fill in all panels. But almost finished now.

Finally done!

Tamiya matt colors are very susceptible to scratches, so before I can handle the model safely it needs a layer of varnish. The clear coat also helps the decals to stick to the model without silvering. Model Master Gloss Clear is my favorite clear but if you put on too thick it can dry milky so take care and spray two or three thin coats rather than one heavy layer.

I was not happy with Tamiya olive drab it looked too dark and more like the early shiny pre-war olive drab rather than the wartime Drab. I sprayed thinned Gunze H78 over the Tamiya XF 62 to lighten the color scheme, and to get a more realistic uneven olive drab shade. The neutral grey underside is a bit too light but some dark washes will remedy that.


I could not get enough of the tedious work of masking so I decided at the last moment to choose decal option "Man o War II" with red fins. Well it's my day off so I had some spare time to mask and paint the red.

Deicing boots were masked off and painted semi-gloss black.

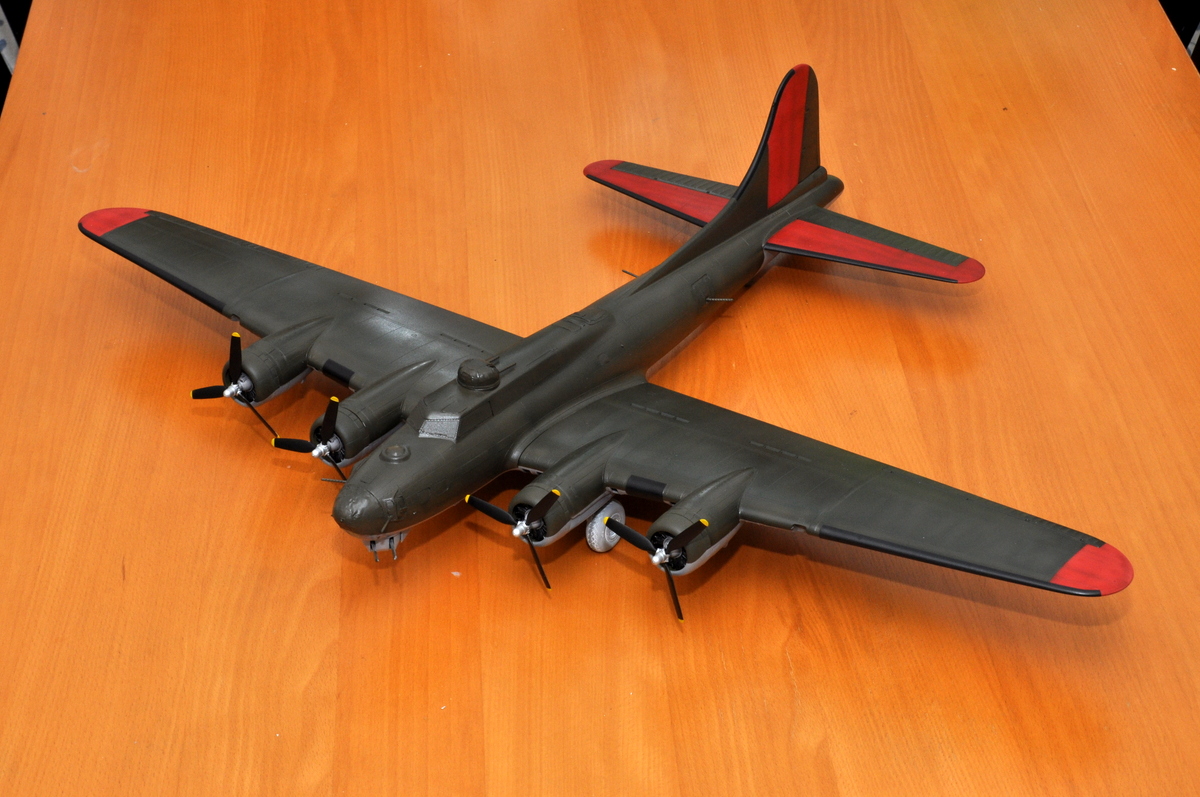

Last pictures before finishing.

Now I have lowered and softened the the border between Olive Drab and Neutral Grey and I think it raises the overall impression a notch.

Eagle Strike decals are a little thick and do not seem to react well with my decal softener, especially national insignia on the wing seems to settle bad. I should have anticipated this, especially when I had the same problem with the large decals on my 1:48 scale Lancaster. I should have painted on the markings instead. I have pricked the decal with a scalpel and given it an additional treatment with decal softener and hope it settle overnight. If not I have to remove the decal and paint it on instead.

The aircraft is ready for a final layer of matte varnish. And I take the opportunity to build the bomb car and paint the mechanics. Almost done now.
No comments:
Post a Comment