

Saturday, 31 December 2011
My workbench
Thursday, 29 December 2011
Late 17th and 18th century Swedish uniforms and equipment.
I took these pictures at the Army Museum in Stockholm. The next best museum in Stockholm and a must if you visit the city

Harnesk m/1683
The cavalry armour stopped a musket ball from
20 paces. All armour were actually tested before delivery.

"Kyller"
A thick elk leather coat was worn under the armor

Officers Gorget 1670
Worn by all officers. the king's monogram is missing.

Officer, Upplands regiment late 17th century

Private, Upplands regiment late 17th century

Swedish Field drum , The great northern war 1700 - 1721

Swedish Cavalry , The great northern war 1700 - 1721

Some pictuers of the "Karolin" uniform. Foot soldiers wore the same type of uniform, except for the boots

At the beginning of the Great Northern war the "karpus" cap was still common.

Infantry musket m/1716 and sword m/1711
After the defeat at Poltava it was necessary to equip a new army. this time with less expensive materials.

Uniform m/1756
From left: Shirt and underwear. Vest with arms and pants with flap and buttons. Uniform coat and tricorne. Cape.

Uniform m/1756
From left: Sword. Belt and holster for the sword and bayonet. Shoes.

Cartridge box m/1756

Small pelt knapsack.
Wednesday, 28 December 2011
RLM TO NCS

I'm currently translating Eagle Editions RLM paint chips to the NCS-system. These are not 100% matches but as close as possible (certainly closer than some hobby paints). The NCS colour system is available in most of Europe. A full fan deck with 1950 samples cost around 70 Euro and It's available in most well stocked paint stores. The link to PerBang.dk is very useful for those of you who are familiar with colour theory and mix your own colours.
RLM 02 - S 5010-G70Y (50% Darkness, 10% Saturation, 30% Green, 70% Yellow)
RLM 61 - S 8502Y
RLM 62 - S 6030-G50Y
RLM 63 - S 6010-G50Y
RLM 65 - S 4010-B70G
RLM 66 - S 7502-B
RLM 70 - S 8005-G20Y
RLM 71 - S 8010-G70Y
RLM 72 - S 8005-G50Y
RLM 73 - 8005-B80G
RLM 74 - No match
RLM 75 - S 6502B
RLM 76 - S 3010-B70G
RLM 78 - S 2030-R90B
RLM 62 - S 6030-G50Y
RLM 63 - S 6010-G50Y
RLM 65 - S 4010-B70G
RLM 66 - S 7502-B
RLM 70 - S 8005-G20Y
RLM 71 - S 8010-G70Y
RLM 72 - S 8005-G50Y
RLM 73 - 8005-B80G
RLM 74 - No match
RLM 75 - S 6502B
RLM 76 - S 3010-B70G
RLM 78 - S 2030-R90B
RLM 79 - No match
RLM 80 - S 8010-G30Y
RLM 81 - No match
RLM 82 - No match
RLM 83 - No match
Sandgelb I - S 3040-Y30R
Blaugrun - S 3010-G10Y
RLM 80 - S 8010-G30Y
RLM 81 - No match
RLM 82 - No match
RLM 83 - No match
Sandgelb I - S 3040-Y30R
Blaugrun - S 3010-G10Y
Tuesday, 27 December 2011
Airfix 1:72 Vickers Valiant

A late Christmas present arrived today from Amazon.com (no fault to Amazon I ordered late) The mighty Vickers Valiant from Airfix. Ay Caramba! this one is as big as my Tamiya Lancaster and it comes with it’s own nuke! How awesome isn't that? In the box you get 142 nicely moulded parts on six sprues and huge decal sheet printed by Cartograf with options for four different markings. Oh did I mention that this is a big bird? Yes I did, but not how big! this one has a wing span of half a meter in 1:72 scale, impressive. (OK I admit not as impressive as Monogram’s B-52). I’m going to build option A, a Valiant Mk.1 in all white from operation Grapple of course, it’s Christmas after all.


Sunday, 25 December 2011
USAAF / USN to Tamiya acrylics
This list is work in progress.
42 Medium Green XF13 OR XF13:1 + XF5:1 + XF21:1
43 Neutral Gray XF53
M-485 Blue Gray XF18:3 + XF2:1
M-495 Light Gray XF19:2 + XF2:1
ANA 601 Insignia White
ANA 603 Sea Grey (neutral) XF53
ANA 606 Semi-Gloss Sea Blue
ANA 607 Non-Specular Sea Blue XF17 OR XF17:6 + XF8:6 + XF53:1 OR XF17:5 + XF8:3 + XF2:2
Dissclaimer.
I have not tested these recipes my self and I have no idea how credible they are. It is impossible to define a color without having access to a real color sample. The result of mixing ready-made paints with each other is often unpredictable because you never know what typ of pigment is included in the mix. So use these tips only as a starting point for your own experiments.
42 Medium Green XF13 OR XF13:1 + XF5:1 + XF21:1
43 Neutral Gray XF53
M-485 Blue Gray XF18:3 + XF2:1
M-495 Light Gray XF19:2 + XF2:1
ANA 601 Insignia White
ANA 603 Sea Grey (neutral) XF53
ANA 606 Semi-Gloss Sea Blue
ANA 607 Non-Specular Sea Blue XF17 OR XF17:6 + XF8:6 + XF53:1 OR XF17:5 + XF8:3 + XF2:2
ANA 608 Intermediate Blue XF18 OR XF18:5 + XF2:4
ANA 609 Azure Blue
ANA 613 Olive Drab XF62
ANA 616 Sand
ANA 621 Dark Gull Grey
ANA 623 Glossy Sea Blue
Zinc Chromate XF3:2 + XF5:1
DuPont colours
71-021 (FS36622) XF 19
71-013 XF 13 OR XF-13:1 + XF-5:1 + XF-21:1
71-009 (FS30219) XF 52 OR XF-13:5 + XF-5:3 + XF-21:1
ANA 609 Azure Blue
ANA 613 Olive Drab XF62
ANA 616 Sand
ANA 621 Dark Gull Grey
ANA 623 Glossy Sea Blue
Zinc Chromate XF3:2 + XF5:1
DuPont colours
71-021 (FS36622) XF 19
71-013 XF 13 OR XF-13:1 + XF-5:1 + XF-21:1
71-009 (FS30219) XF 52 OR XF-13:5 + XF-5:3 + XF-21:1
RAF & FAA WW2 Tamiya Acrylic.
I haven't tried them myself, but merely collected them from various forums and pdf’s.
Azure blue XF16:2 + XF2:10 + XF18:5
Dark earth XF:52:1 + XF64:1
Dark green XF81
Dark sea grey XF54
Dark slate grey XF22:19 + XF7:1 + XF1:4
Extra dark sea grey XF24:50 + XF2:6 + XF8:3
Interior grey-green XF5:1 + XF21:3 + XF65:1
Light sea grey XF25
medium sea grey XF83
Middlestone XF59:1 + XF60:1
Ocean grey XF82
PRU blue XF18:2 + XF21:1 (Ad a tiny bit of X8 for a richer blue tint.)
Sky XF21
Sky grey XF19
Slate grey XF22
Thursday, 15 December 2011
Painting figures the easy way Part 1
Svensk pdf här: Måla figurer steg för steg PDF
English pdf here: Painting figures the easy way Part 1
English pdf here: Painting figures the easy way Part 1
Friday, 9 December 2011
Airfix 1/32 Afrika Korps

I got a little nostalgic in the hobby store today and picked up pack of classic Afrika Korps soldiers, now in the new paint friendly K-resin.


The figures has recived a base coat of Army Painter Matt Black.

I think the best way to paint the figures fast is start from a black undercoat and use that to define small details like webbing, pouches and weapons, then use Army Painter Quick Shade to shade the whole figure in one go. Next I have to work out the best way to high light the figures.


I used some different Tamiya wethering sets to dry brush the figure. Finally I sealed the paint job with Citadel satin varnish. I need to fill the ejector pin marks on the rest figures (I forgot it on this figure)
Revell British Infantry 1/72

Let's see if these 1/72 British soldiers will look like Maasians next to the 1/76 tanks?


To prevent the color to flake off I first gave the figures a liberal coat of polyurethane satin varnish and let the them dry over night. Next I sprayed a base coat of Army Painter matt white.
I painted the uniforms Vallejo 921, Webbing and backpack and helmet 924, Leather Jerkin 846, I washed the figures with army painter strong tone, and finally gave them a layer of satin varnish. The base is actually a wooden name plate bought In an arts and craft store. I treated the plate with Liberon Bistrot varnish to give it a more pleasing look.


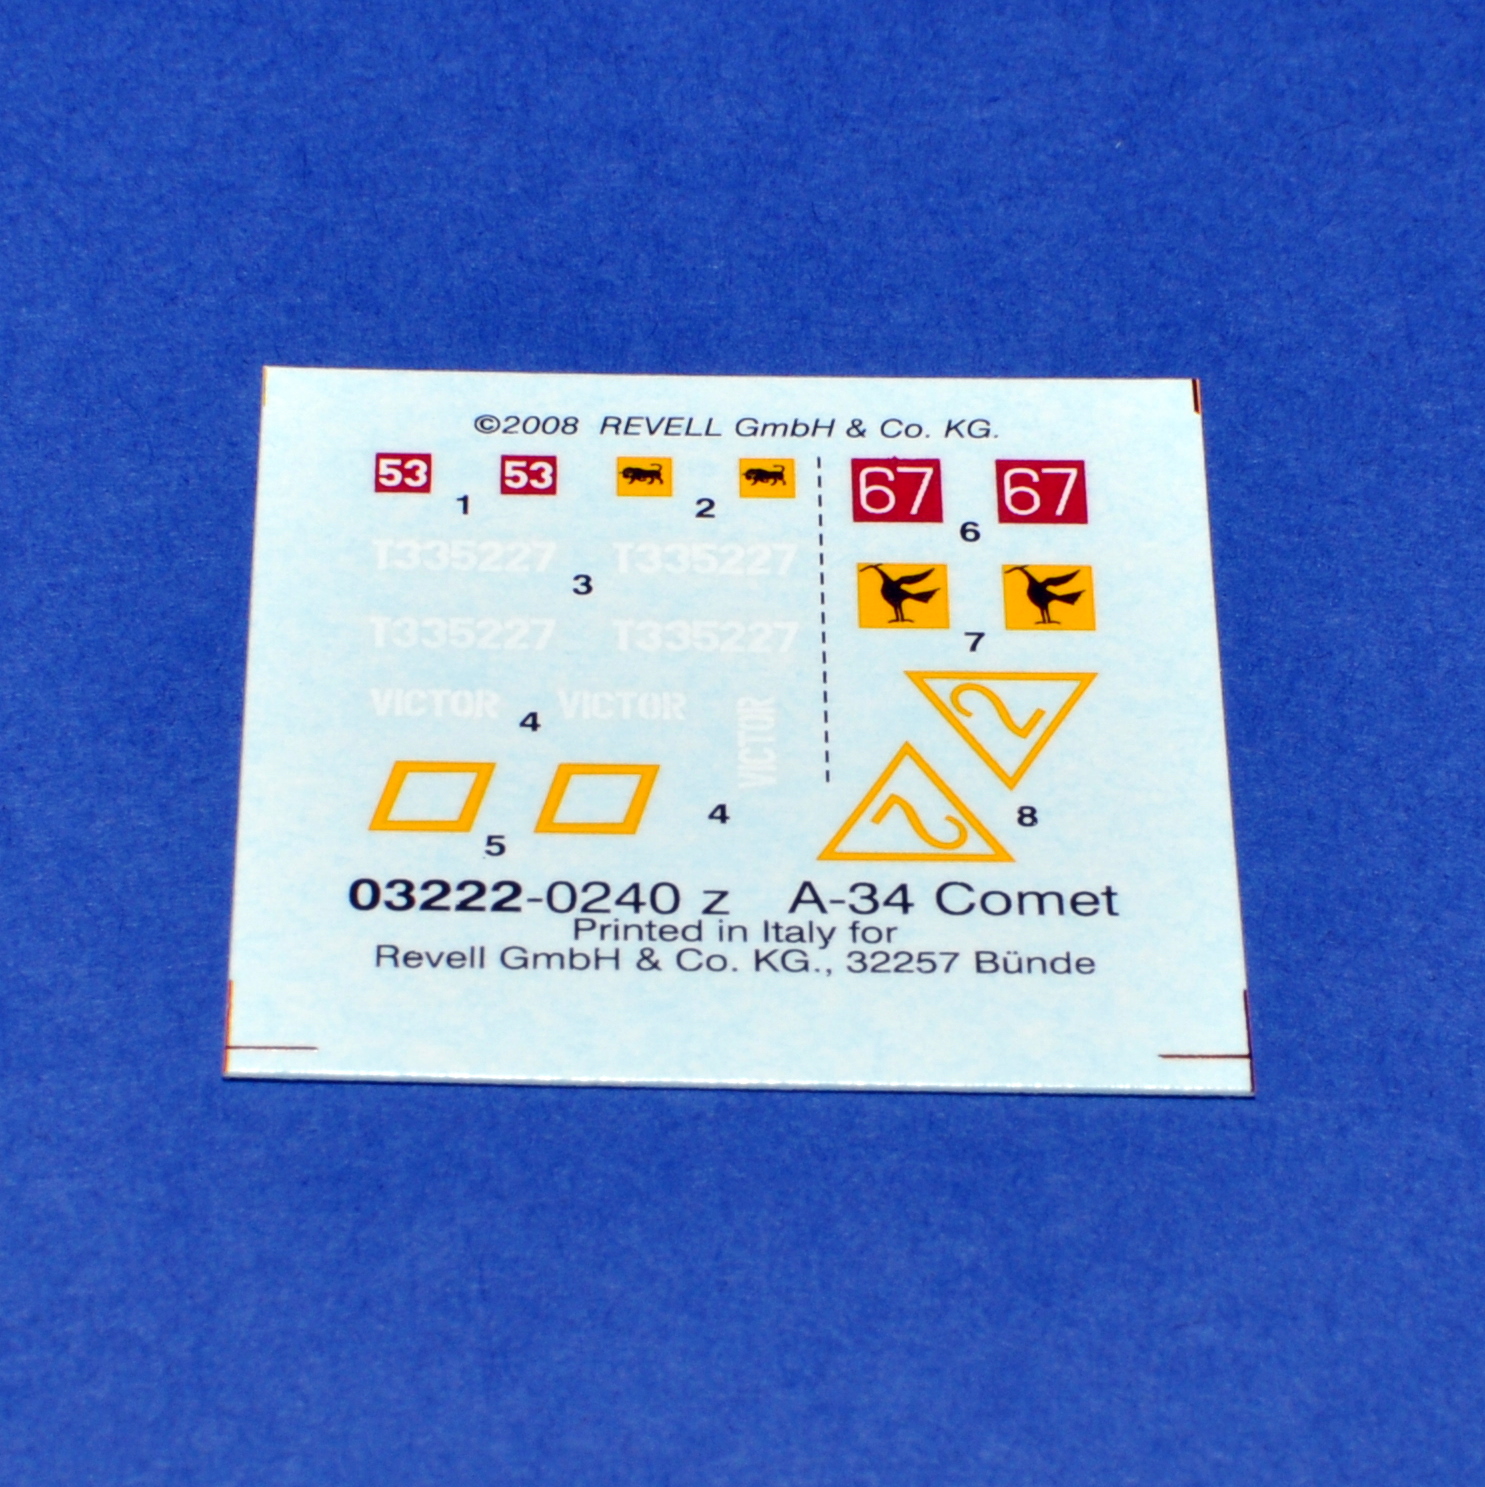
Revell A-34 Comet mk I 1/76

Revells A-34 Comet tank is in the same 1/76 scale as the new Airfix Cromwell and they share the same colour scheme so I will be building theme simultaneous. The kit is actually an old Matchbox kit so the detail is a bit soft and the tracks are of the old soft vinyl type but these old armour kits usually go together with out to much fuzz.

Thursday, 8 December 2011
Airfix Cromwell IV Tank 1/76 New Tool

Christmas came a little early this year in form of three little red Christmas presents from Airfix. First out is the Cromwell tank in the ,nowadays, odd 1/76 scale. The kit has very fine details and the mouldings are very crisp. Some parts are really minute and and it will take some steady hands to assemble these, beware of the carpet monster! The tracks are moulded in one piece, something I’ve only seen in kits for table top war-games until now, and this will really speed up the building process. Personally I hate to assemble the tracks link for link, the tracks always turns out to be either to short or to long so I hope to see this solution in more armour kits. You get two decal options, 5th Royal Horse Artillery and 11th Armoured division, both in Khaki Green H159.
I think it would have been far better if Airfix had chosen the now standard 1/72 scale for their new armour kits but Airfix probably wanted to match it with their old armour series and figures. Personally I can only notice the differences between the two scales if I put two kits of similar subject side by side although a knit picker would probably disagree with me, but it could be a problem if anyone wants to put toghter a diorama with some 1/72 soldiers.

Airfix Curtiss Hawk 81-A-2 1/72 New Tool

Next is the Curtiss Hawk in Flying Tiger scheme. The kit is of the same standard as we are getting used to from Airfix these days and the kits high lights are the wing guns and the separate wheel hubs. The decals from Cartograf are particularly nice with very crisp printing. As with the Zero you get only one colour option, the Flying Tigers in China 1942. The instruction calls out for H28 on the underside and H116, H119 on the top side. The true nature of the aircrafts DuPont made colours are frequently debated in the modelling community but I think Airfix is in the ball park with these colours.


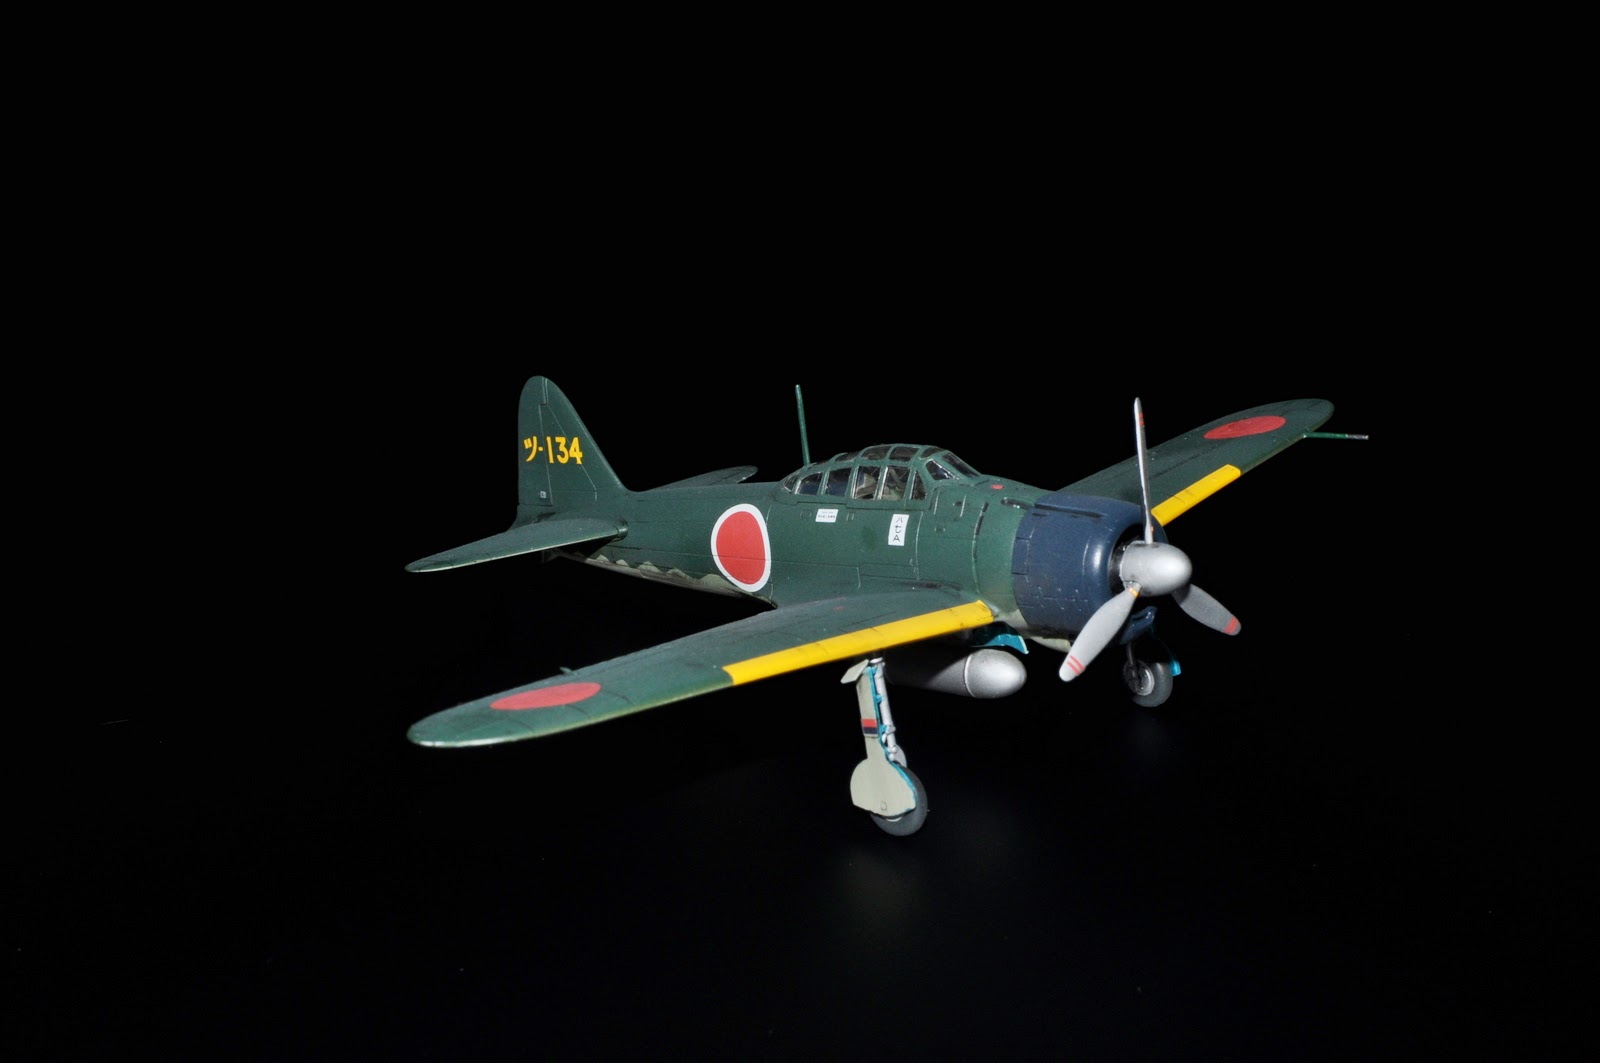
Airfix Mitsubishi A6m2b ZERO 1/72 New Tool

Last is the all new Zero-fighter, a really nice little kit with an equally nice price. The kit consist of three spruce with 47 finely moulded parts, a one part canopy and a high quality decal sheet from Cartograf. You get only one colour option, a machine from 201st Kokta at New Guinea 1944, in Mitsubishi Green and IJN Light Grey. The instruction tells you to use H75 and H90 but I have learned to take those “Airfix recommended” Humbrol colours with pinch of salt (or two!) so I'm going to check my own library and the net before I chose my colours. Some have criticised Airfix for the somewhat heavy panel lines but I never found them to be a problem once the kit is painted. You can always give the kit a coat of primer before you paint to fill up the lines a bit.


I assembled and painted the cockpit Tamiya XF-7 and a decal took care of the instrument panel. The rest of the major parts went together without any problem. The plastic in this kit is very brittle and I mange to break the steering stick when I tried to remove it from the sprue. I made a new stick of a piece of wire.

The engine was painted semi gloss black and then dry brushed with light gun metal from a Tamiya weathering set.

I painted the model with Tamiya's acrylic paints. The topside XF70 and underside XF76. Once everything dryed I sprayed the model with a layer of Model Master Gloss Clear. The decals were very nice and they worked well with Micro Set / Sol decal fluids, no problem here. I put on a wash of diluted black oil paint to accentuate the panel lines and finished the model with a coat of Model Master Flat Clear.


Subscribe to:
Comments (Atom)