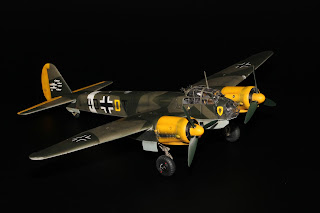
Revell 1/72 Junkers Ju 88 A4 review.
Let me start by saying that this really is an excellent kit. All the parts are beautifully cast and without any flash or ejector pin marks. The assembly starts with the cockpit and it is one of the most detailed 1/72 scale cockpits I come across. The only thing missing is the seatbelts. I followed the painting instructions but substituted Revell paints for Gunze acrylics. The seats had weak glue points and I reinforced with super glue to avoid having a lose seat spoiling the model once it were finished.
The fuselage and clear parts went together without any problem and the required only a small amount of filler. The wings however had separate wingtips and ailerons and I had some problem getting those parts to fit correctly. I never actually got these parts to look good on my model. The engine nacelles fitted ok but I used som super glue to secure them at a straight angle. The decal sheet is very nice but the instruction on were to put all the small decals are rudimentary to say the least! Most are just an arrow pointing att a general direction. After looking at some pictures of the real thing it was obvious that the instructions were useless. Lacking sufficient knowledge and reference material, I decided to skip all the small text and lines but not before I mange to get some decals at the wrong place.
I post shaded the panel lines with Tamiya Nato Black. This was a little stark for the Rlm 71 and a tad to weak for the Rlm 70. The yellow parts were shaded with a dark yellow brown. I finished the model with a coat of Citadel purity seal.
Not happy with the outcome, especially around other wing area and the decal placement, maybe I will give this kit another go in the future. I Just need to get some good reference first.
I highly recommend this kit, the fit problem with the wingtips and ailerons are easily overcome if you give it some time and care (witch I didn't). But get your reference material before you start.


No comments:
Post a Comment